The VLC media player is one of the most used media streaming software which almost everyone has in their computer system but how to set default audio track in VLC is a problem to many.
If you have ever played a media content by selecting Open With the program and then adding other media content in the VLC media player playlist, you must be familiar with how tedious the process can be to set default audio track in VLC. Every bit takes so long in that moment, as it takes a lot of time and effort to select programs one by one and adding in the playlist.
But what makes it more difficult to use it is streaming the audio or video files with multiple audio tracks. It is a troublesome decision to choose the audio track with each file. It is pretty hard to handle especially when you run the series of an episode in the VLC player. For every episode, changing the track manually is disturbing and asking a lot of efforts. It ruins the enjoyment, but you don’t have to worry as the guide will help you set default audio track in VLC. With the help of the guide, you don’t have to change the audio track manually. If you don’t know the procedure to set default audio track in VLC, then follow the steps mentioned below.
Here’s how to set default audio track in VLC
- RunVLC media player in your computer system.
- Remember, you don’t have to run a media file in the player right now.
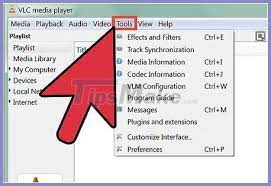
- Click the Toolstab from the upper toolbar of the media player.
- Now, go to Preferencesand select the button.
- You press Ctrl + Pto open Preferences
- Ensure that Simpleoption is marked at the bottom left corner on the window. If not marked then select the Settings option.
- Now, select the Audiotab from the left side.
- Navigate to Trackssection.
- Enter the language code in the Preferredaudio language If you don’t know the code, you can check them on the internet.
- Try using engfor English, spafor Spanish and jpn for Japan.
- Now, select Subtitles & OSD
- Here, you can set a default subtitle track and customize the Fonts size, Shadows, etc.
- Now click the Save
- Now, restartVLC media player.
Do you know how to change Language in VLC media player?
Here is all you need to know to change language and audio setting on your VLC media player software on your device.
- Open VLC Media Player
- Go to Tools menu and click on Preferences or Press CTRL + P
- Click on the interface tab/icon on the top left (should be selected by default)
- From the languages option, select the menu/interface language you prefer
- Click save or hit enter
- Close and restart VLC. The effect should take place.
How to change the audio language in VLC media player?
- To change the audio language in VLC, just open the multi-language video in VLC media player.
- Right-click in that video and click “Audio” and choose “Audio Track”.
- Under the Audio Track, you can select any one of the languages like Track 1 – [English], Track 2 – [Hindi], Track 3 – [Tamil], and more.
Use this method to change Language Setting in VLC media player on your device effectively. To change the language back to English, follow the same given steps. If you have mistakenly chosen the wrong language and you are unable to change the VLC Language Setting, try uninstalling and reinstalling the app for it to go back to English as the primary language. Also, if your preferred language is not available on the app currently, wait for VLC to add it in their list of offered languages.
Your point of view caught my eye and was very interesting. Thanks. I have a question for you.
I don’t think the title of your article matches the content lol. Just kidding, mainly because I had some doubts after reading the article.