Don’t let anyone tell you that your Facebook business Page doesn’t matter anymore.
Sure, organic reach might be down for many businesses on Facebook.
Meanwhile, the majority of consumers today turn to social media to research products and services. Since Facebook is still the most active social network, it’s a prime place to build your presence.
And if you’re serving local customers, a Facebook business Page is an absolute must-have.
Think of your Facebook presence as your business’ central hub away from your website, allowing you to do the following:
- Encourage new bookings and appointments
- Curate customer reviews
- Run Facebook-exclusive promotions and ads
- Engage customers and take questions from prospects
- Boost your business’ organic search rankings
Curious how to do all of the above? We’ve got you covered!
How to create the perfect Facebook Business Page step-by-step
Although it may be pretty simple to create a Facebook business Page, optimizing your Page for engagement requires some attention to detail.
And yes, the process has changed a bit if you’ve been away from the platform for the past couple of years.
In this guide, we’ve broken down everything you need to know to optimize your business’ presence.
Let’s dive in!
Step #1: Create your Facebook Business Page and choose a category
First things first: head to Facebook’s “Create a Page” site.
(No surprises here. Assuming you’re putting together a Page for your business (think: not a community or influencer Page), select “Business or Brand” on the left.)
You’ll then be prompted to choose a category for your business. There are tons of options here: simply select whichever category aligns closest with what your business.
When in doubt, you can always go with a more general category such as “Brand” or “E-commerce.”
Upon selecting a category, you’ll be asked to enter an address. Don’t panic if you’re not a local business: you have the option to hide your address if you don’t want it displayed to the public.
Once you’ve entered your address, you’re ready to start building your Page.
Step #2: Put together your profile imagery
After your Page is officially created, the first thing you’re asked to do is select an appropriate profile and cover image.
This is a big step. Your profile imagery is easily one of the most important aspects of your Facebook business Page.
Consider that your Page and cover images are likely the first elements of your profile that someone will see when they land on it.
Facebook profile pictures are sized at 180×180 pixels.
If you decide to use text, make sure that your font’s choices are clearly legible and don’t display too many colors. Keep it simple.
At 820×312 pixels on desktop, your Facebook cover gives you some room to get creative.
You might notice many businesses simply post a high-res photo of their team or storefront. This is fine, but note that your cover photo is valuable, must-see real estate for your visitors.
So take advantage of it!
For example, businesses can use their covers to show off company slogans or banners that give their Pages a bit of personality.
Meanwhile, some businesses use the space to highlight promotions, hashtags or products.
If you don’t already have photos in mind, use a tool like Canva for inspiration. Their library has a ton of pre-sized Facebook cover photos and other social media images you can edit yourself.
Step #3: Pick your @username and URL
So far so good!
As a quick side note, take the time to pick out an appropriate URL and @username for your Facebook business Page.
This might seem like a small detail, but note that Facebook does not want you to change your URL more than necessary.
Generally speaking, use your business’ name (granted it’s not too wordy) or a URL that matches the rest of your social @handles. Conventional wisdom tells us that shorter URLs are ideal and typically easier to remember.
If your business’ name is taken, consider you can tack on a term related to your product or industry (@giordanospizza), a business-related suffix (@foxtailcoffeeco) or a location-specific term (@euclidrecordsNOLA).
In the case that Facebook doesn’t automatically prompt you to change your Page URL, you can do so by going to the “About” section of your profile.
Step #4: Pick an appropriate Page template and Tabs
Once the basics of your Facebook business Page are done, select “Edit Page Info” or “Settings.”
To the left, you’ll see the “Templates and Tabs” feature. This allows you to customize which tabs appear on the sidebar of your Page (“Reviews,” “Offers,” and so on).
Templates are available for a variety of categories such as shops, restaurants and service businesses. These templates automatically populate tabs based on what makes sense for these types of brands.
Of course, you’re allowed to customize your Templates by adding or removing tabs beyond the default ones.
There is no “right” answer on what tabs you should enable, but stick to the principle of “less is more.” Too many tabs are overwhelming to visitors and likewise, make your profile look incomplete if you aren’t actually using them. Hint: don’t use the “Instagram” tab if you don’t have an Instagram for your business.
Later in the guide, we’ll talk about some important tabs that we recommend for the sake of engagement and discoverability for your business.
But first, let’s build out your “About” section.
Step #5: Fully fill out your business’ key details
Selecting “Edit Page Info” again, make a point to fill out as much information and go into as much detail as possible.
Details such as your contact information (email, phone number), hours and location are make-or-break for determining whether or not someone can actually reach your business via Facebook.
Double-check that this information is accurate and up-to-date. For example, make sure that your Google Maps listing works and that your page actually links out to your website.
Another key piece of your “About” tab is the summary under “More Info.” Here’s your space to highlight your company’s unique story, personality and relevant products or services that you offer.
Imagine that somebody’s learning about your business for the very first time: what would you want them to know about you? This isn’t a place to stuff keywords but rather summarize what you’re all about.
Step #6: Choose an appropriate call-to-action
Perhaps one of the smartest ways to use your Facebook business Page is as a means to funnel traffic to your website.
Facebook makes it easy to drive traffic to your website through a call-to-action button. You can find this feature under your cover photo.
Although you can’t fully customize your call-to-action phrases, you do have the option to link your CTA button with your appointment-setting software or e-commerce platform. You can also just use the button to send traffic to a specific website or landing page.
Step #7: Enable the “Services” tab and fill out your details (recommended)
This step might not be possible depending on which type of business you run, but we highly recommend it.
In short, the “Services” tab allows you to highlight your business’ specific offerings in detail.
For example, an orthodontist might talk about Invisalign consultations on their Services page or an optometrist might talk about Lasik.
This is an opportunity to show off your expertise and likewise inform visitors more about your business. As an added bonus, it also represents a subtle SEO opportunity that can actually help your Facebook business page rank for relevant keywords in Google.
Of course, don’t use this space to spam. Instead, use it as intended to make your Facebook business Page even more comprehensive.
Step #8: Make sure that your Messenger makes sense
Now, go to “Settings” and select “Messaging.”
Here you’re able to customize your Facebook Messenger with auto-replies, away messages and other greetings to ensure that visitors get the information they need when they try to get in touch.
Again, there is no correct way to approach Messenger. Assuming you’re a solo or small business, make it a point to try to respond to customers in real-time but also consider setting up an FAQ to handle simple questions you can elaborate on later.
Given the importance and growth of social media care, you can’t afford to ignore Messenger. It may take some experimenting to figure out what to include in your replies but doing so can ultimately help you retain more customers.
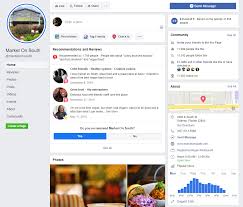
Step #9: Enable customer reviews (recommended)
If you’re a brick-and-mortar business, we highly recommend setting up reviews for your Facebook business Page.
This is a brilliant way to curate social proof and positive comments. Likewise, reviews automatically populate on your Page and showcase what your customers like about your business.
Of course, this also opens up the responsibility of moderating reviews and having a strategy for managing them.
You may wonder whether it’s worth the potential headache to deal with spam and trolls. And rightfully so.
That said, keep in mind that Facebook star-ratings actually show up within both Facebook and Google searches. Having good feedback on display may very well set you apart from your competition when prospects are looking you up.
With these steps knocked out and after posting some introductory content, such as team and product photos, your company’s Facebook Business Page is just about ready for business.